
 Okapi Shared Help
Tutorial 1 - Text Extraction
- Introduction
-
Getting Started
- Specifying the Common Parameters
- Specifying the Utility Parameters
- Output
|
|
|
- Introduction |
|
This tutorial provides a step-by-step guide on how to use the Text Extraction utility from Rainbow. It touches on many different aspects of how to use Rainbow and presents some of the basics on how utilities works. Even if you do not use the Text Extraction utility you should go through it.
This specific example illustrate how to prepare files in different formats into RTF files, so translation editors such as Wordfast or Trados Translator's Workbench can be used to translate the text.
Note that tutorials may not be updated as frequently as the Okapi tools, so some options and screen shots may not reflect the latest versions of the tools and components available.
Requirements:
Start Rainbow.
If you have a project loaded automatically, you need to reset all the project settings. To do this, select the command New from the File menu (or press Ctrl+N). Now you should have an empty project.
Go to the Input List 1 tab. You should have the following screen:
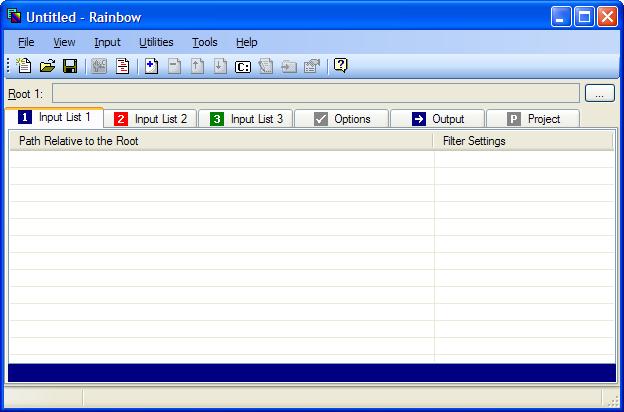
The Text Extraction utility allows you to prepare different files for translation. As all utilities it has two types of parameters:
You must set whatever common parameters used by the utility before calling the utility. The list of required common parameters for each utility is provided in the help file for that utility.
For the Text Extraction utility you must set the following common parameters:
Files of the first input list (the files to extract)
Root for the first input list
Source language
Target language
Source default encoding
Target default encoding
To add files to the first input file list: Go to the Input List 1 tab if you are not yet there, then select the command Add from the Input menu (or press Insert). A dialog box titled Add Files to Input List 1 should open.
Select the files to
insert into the input file list. In this example we are using all the files located in the folder:
"C:\Program Files\Okapi\Shared\Samples\T01".
Highlight all the files in that folder and click Open.
Now you should have the files listed in Rainbow:

There
are other ways to list input files. You can select the files (or the
folders) in Windows Explorer and drag-and-drop them over Rainbow. You can
also select the command Add Multiple from the Input
menu and select a set of files based on a pattern like *.txt, etc.
Now that we have our input files listed we need to make sure each one is associated correctly with a filter.
First notice the icon associated to each file. They indicate the format of
the file. The '?' icon indicate that no format has been recognized for the
given file (here Sample.pro is like that).
Notice also the
information in the Filter Settings column. Each file can be
associated to specific filter settings. When the information is between
angle-brackets (e.g. <okf_netres>) it indicates that the settings
used are the default for the give file format. You can override the settings
for each file if you want, in that case your choice will be displayed
without the angle-brackets.
One of the files has no settings by default:
For Sample.pro Rainbow was not able to guess a format,
therefore it cannot associate filter settings either. Sample.pro is actually a Java properties file
(albeit one with an unusual file extension). Rainbow does have a filter for that
format, so we should override the default to associate the proper filter
settings for this file.
To change the filter settings of a file:
Select
the desired file (here Sample.pro), then select the command
Properties from the Input menu (or press Alt+Enter, or Space).
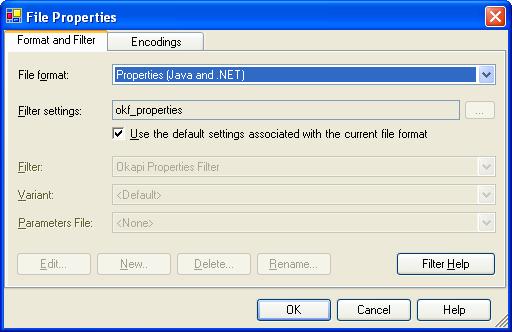
You can also double-click the filter settings itself. This will open the File Properties dialog box.
There
are two tabs in this dialog box. You should be on the Format and
Filter tab. At this point we could unselect the option Use the
default settings associated with the current file format and choose
the filter settings we want. But a better way is to first look if Rainbow
does not have by any chance a pre-defined entry for Java properties in the
list of its recognized formats. Click the File format drop-down
list. there is an entry called "Properties (Java and .NET)", that is our
format. Select it.
You should have now something like this:
Click
OK to apply your change. Now Sample.pro should be
associated with <okf_properties>.
With the Text Extraction utility any file not associated with a filter is simply copied into the output folder without being modified. This way you can make sure that files you may not want to translate (e.g. CSS stylesheet, XSLT templates) go along with the translatable files that use them.
Now we can move to the next step: defining the root for the files.
The root of a input file list is used by some utilities to work with relative paths rather than absolute paths. This is very convenient when you move a whole set of files in various sub-folders. The Text Extraction utility requires a root.
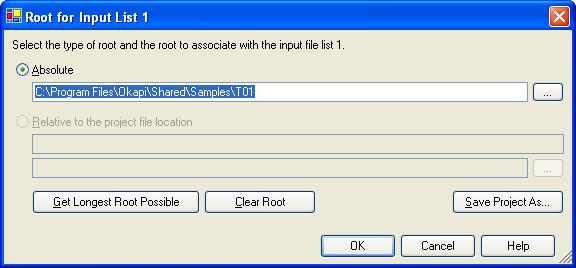
Select the command Edit Root from
the Input menu (or press F2). The
Root for Input List 1 dialog box opens. There enter the common root for all the
files we want to prepare: "C:\Program Files\Okapi\Shared\Samples\T01".
You could also click Get Longest Root Possible button to
set it automatically.
Note
Because the root is very often the longest common part of all input paths
Rainbow offers a command to define this without opening this
dialog box: Switch Default Root in the Input menu
(or press Ctrl+F2). Press Ctrl+F2 repeatedly to switch the root
between empty and the longest common part of the paths.
By default, once a root is defined, the input paths listed in the input file list show the Path Relative to the Root. That is only the part not included in the root is shown. This allows to shorten it significantly and see only meaningful information.
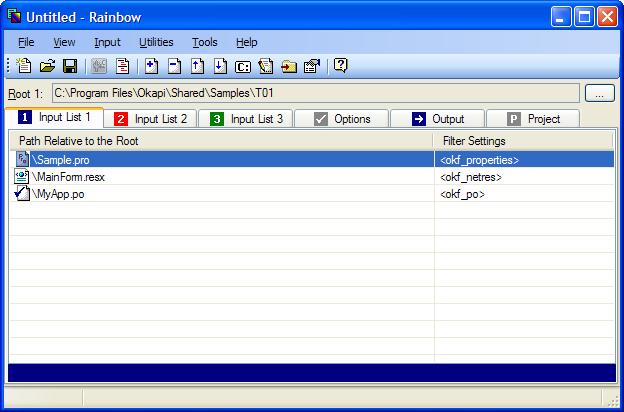
At any time you can switch to the Full Path view by using the command Switch Path Display Mode from the View menu (or by pressing F3). Using that command repeatedly will go back and forth between the two display modes.
The next set of common parameters to define are the input and output languages.
Go to the Options tab of Rainbow. This is where input and output languages are defined.
Note that in many utilities (like Text Extraction) the input language is the language of the source text, and the output language it is the language of the target (translated) text. But this is not always true.
Rainbow uses the language codes defined by the RFC 3066 to specify language information. Here our source files are in US English (en-US). Select whatever target language you want, for example French for France (fr-FR):
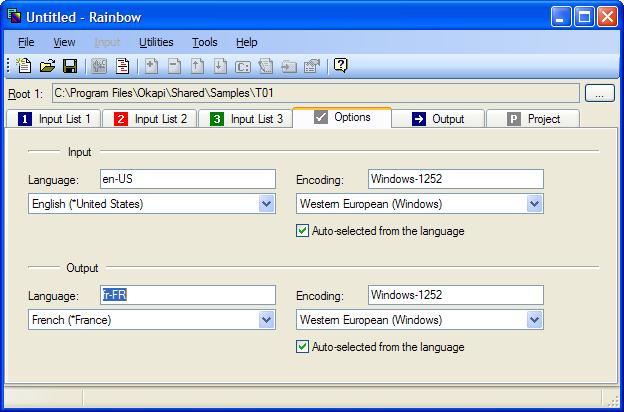
Along with languages we need to define the default encodings for the input and output files.
The input default encoding parameter is used to specify the encoding of any input file that has no mechanism to indicate its encoding. For example, HTML or PO files have instructions to specify in which encoding they are, while a simple text file does not.
Note that the default encoding for the input file depends on what type of file the utility expect for a given input list. Here, the input files are expected to be "source" files. In some other utilities, such as for source and target alignment, one of the input file list will have target files, and therefore the utility requests Rainbow to associate the target default encoding for the files in that list.
Keep also in mind that some files may have bilingual content, such as the PO files, and therefore the input encoding may need to be the encoding of the target language.
You can also specify a different source and target encoding for each file if needed, overriding the default. Use the Encodings tab of the File Properties dialog box for this.
In our example we have three files to process, each in a different format:
Now, all the common parameters required for the Text Extraction utility have been specified. We can move to the next step.
To set the parameters specific to the Text Extraction utility and to run it select the Text Extraction item in the Utilities menu. This will open a dialog box with several tabs.
Note
This dialog box is not part of Rainbow, it is part of the utility module and
could be invoked from a different application than Rainbow.
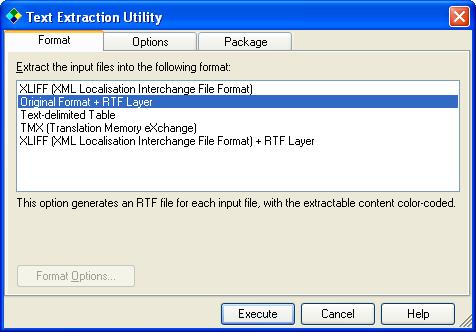
Move to the Format tab.
This is where we specify the way the output files are to be generated.
In
the list Extract the input files into the following format select "Original
Format + RTF Layer". This option will generate output files in the
same format as the input files, but with an RTF layer on top of it. The RTF
layer allows to color-code the data and distinguish between text and codes.
The styles used are the same as for a Trados RTF file, so the generated
files can be translated with Trados tools or any compatible applications,
like Wordfast, SDLX, etc.
If the output format you select has any options, the Format Options button would be enabled, and you should click on it to open the dialog box providing you access to these options. In the case of the output we have selected there is no format-specific options.
Note
Not all output formats are meant to be used for translation. This utility is
doing text extraction as a general purpose, and can be used for other tasks than
preparing files for translation. For example we could convert a bilingual file
into TMX using this utility.
One of the input file to process is a ResX file. Because there may be binary
data in a ResX file, the NETRes Filter is not text-based and does not offer
a direct RTF output capability. In cases like this, the utility will
automatically switch to the "XLIFF + RTF Layer" output format for
this specific file. This allows us to still have an RTF output as we specified.
Move to the Options tab.
This is where some additional information for the creation of the extracted text are specified.
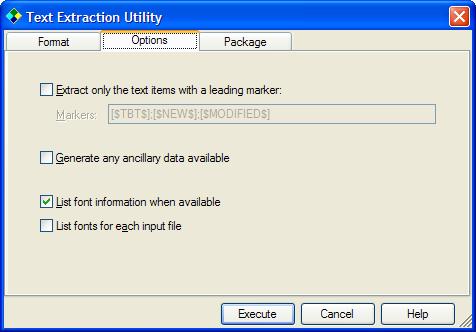
The option Extract only the text items with a leading marker is not used in this example, but it could be very handy if you want to extract only specific text entries.
The option Extract any ancillary data available specifies whether you want to generate the possible ancillary data that are with the input file. An example of such data would be for instance an image inside the source file. In our case, we choose to not extract ancillary data. Note that the ResX format is one of the format that offers this possibility.
The options List font information when available and List fonts for each input file are used to get the list of all fonts used for some formats. Not all filters provide such information. In this example these options do not matter.
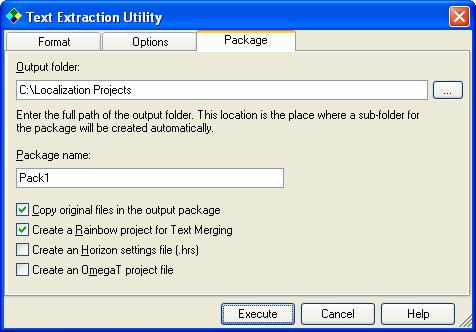
Move to the Package tab.
This is where we define the location of the output and related parameters.
In the Output
folder edit box, enter the folder where you want the package to be
generated. If that folder does not exist yet it will be created during the
execution. You can also select that folder using the browse button. In our
example we want to output our package in the default folder "C:\Localization
Projects".
In the Package name edit box, enter the
name of the package to generate. Here also we use the default name: "Pack1".
The option Copy the original files in the output package is used if you want to have a copy of all original files along with the extracted files. Let's use it here: It could be handy to have during translation. In cases where the text is prepared into XLIFF output, having the original files is also useful as they will be used to merge back the extracted text into its original format.
The option Create a Rainbow project for Text Merging is used to
generate automatically a project file all set for executing the Text merging
utility for any translated file that needs to be merged back. The project is
generated only if you are creating output files that can be merged later on. In
this example the MainForm.resx file will be extracted to an XLIFF
document, so we can use this option to get our merging settings all prepared for
us.
The option Create an Horizon settings file (.hrs) is used to generate a file that can be used with Horizon, a third-part application that can be used to browse easily among many files to translate and offer side-by-side view of the source and its translated version. There is no need to set this option in this example.
The option Create an OmegaT project file is used to generate all the files and folders necessary to use OmegaT, an open-source translation editor. You must select for output files one of the formats compatible with OmegaT. There is no need to set this option in this example.
When creating the extracted files with these
options, the Text Extraction utility generate several
sub-folders: "Original" where the input files are copied,
and "Work"
where the RTF files are created, If there are any
non-processed file, they would be copied in a "Target"
sub-folder.
Because one of the file is extracted to XLIFF, the Rainbow project for merging it back is created. It is located, along with a batch file to run it, in the Target folder.
Therefore, our input files will generate the following output files:
C:\Localization Projects\Pack1\Original\Sample.pro C:\Localization Projects\Pack1\Original\MyApp.po C:\Localization Projects\Pack1\Original\MainForm.resx C:\Localization Projects\Pack1\Work\Sample.pro.rtf C:\Localization Projects\Pack1\Work\MyApp.po.rtf C:\Localization Projects\Pack1\Work\MainForm.resx.xlf.rtf C:\Localization Projects\Pack1\Target\_Merge.rbp C:\Localization Projects\Pack1\Target\_Merge.bat C:\Localization Projects\Pack1\Target\*.fprm
Now that we have all parameters defined, we are finally ready to run the Text Extraction utility.
Click Execute.
If the folders you have specified for the output exist already, you will be prompted to select what you want to do with the files possibly there already. The following dialog box will pop up:

Click Yes to delete all files and sub-folders in the specified output folder. Note that the utility will not be able to remove files that are still open with other applications or sub-folders that are activated. If this happens, you will get a warning message in the Log.
Click No to not delete any existing file or sub-folders. However, any output file generated during this process will overwrite any existing file with the same path.
Click Cancel to not delete anything and stop the process.
In this tutorial, if prompted, select Yes.
All warning and error messages are stored in Log window. At the end of the process, if there was no error and no warning the Log window is closed automatically. If any error or warning occurs, the Log window remains opened after the process is done.
When the process is completed, you can open the folder where the output files were generated by selecting the command Open Last Output Folder from the Utilities menu (or press Ctrl+L).
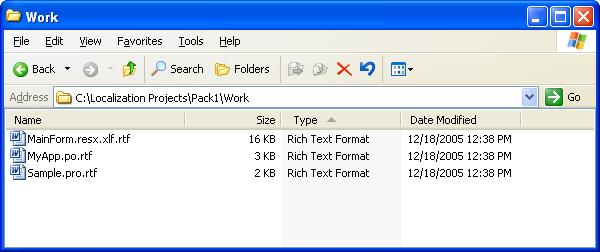
The text extraction is done. You can now use your favorite translation tool to work on the RTF output.
Once the translation is done, to obtain a final version of the translated files:
MainForm.resx.xlf needs to be
merged back. You can use the project file and the batch file that were
created in the Target to execute the merging.At the end, the Target folder should contain the three
translated files in their original format.